How to Pin a Website to Pinterest?
Do you have a high-quality website but haven't tapped into Pinterest's potential yet? Pinning your website on this platform not only helps you reach millions of users but also improves your website's search ranking on Google. However, how do you properly pin a website to Pinterest? And if you're unable to save your website address using HTTPS on Pinterest, how should you handle it? Let's Snappin and explore how to add your website to your Pinterest profile and optimize it to attract more traffic!
I. Does Pinterest Really Help Increase Website Traffic?
Many people still think that Pinterest is only for those who love beautiful images, fashion, or design. However, in reality, it is a potential platform that can help websites attract significant traffic, especially if you know how to leverage it.
Pinterest functions as an image search engine where users save (pin) content that interests them. Each pin can link to a specific website, driving organic traffic without requiring a large investment in advertising. According to statistics, over 85% of Pinterest users use the platform to search for and purchase products. This means that if your content appears on Pinterest, your chances of attracting potential customers increase significantly.
Pinning your website on Pinterest also helps improve SEO. Links from Pinterest can enhance your website’s credibility, supporting its ranking on Google. The key is knowing how to properly add your website to your Pinterest profile to fully maximize these benefits.
Read more: Pinterest downloader
II. How to Pin a Website to Pinterest

If you own a blog, an online store, or any website, follow the steps below to properly link it to Pinterest.
Step 1: Log Into Your Pinterest Account and Access the Settings
Before adding your website to your profile, you need to log into your Pinterest account. If you don’t have an account yet, you can sign up for free using your email, Google, or Facebook account. Using a Pinterest Business account offers more benefits, especially if you want to track the performance of pins that lead to your website.
Once logged in, click on your profile picture in the top right corner of the screen. A menu will appear—select “Settings” to access your account management page.
Step 2: Navigate to the "Claim Website" Section and Enter Your Website URL
In the settings page, locate the “Claim Website” section. This is where Pinterest allows you to add and verify ownership of your website.
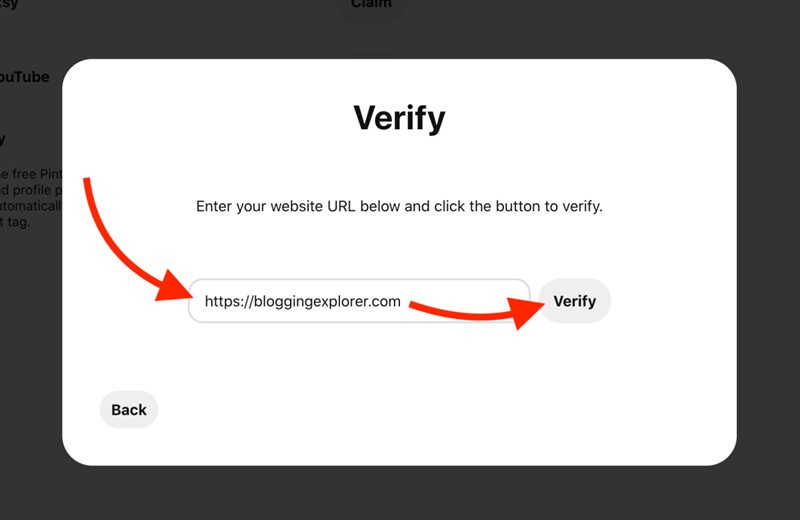
You will see a blank field asking for your website URL. Enter the full website address you want to link, including https:// if your site uses a secure protocol. Click “Claim” to submit your request to Pinterest.
At this point, you’ll need to complete an important step—verifying your website ownership so that Pinterest can recognize you as the legitimate owner.
Step 3: Verify Website Ownership with Pinterest
Pinterest requires users to prove that they have full control over the website they added. To do this, you will need to choose one of three verification methods:
Method 1: Add an HTML Tag to the <head> Section of Your Website
This is the most common method, especially for those who have access to their website's source code. When selecting this option, Pinterest will provide you with a short HTML code snippet.
Copy this code, then go to your website management panel. You need to open the HTML file of your homepage and insert the code inside the <head> tag. If you are using WordPress, you can add the HTML tag by:
-
Installing the Insert Headers and Footers plugin and pasting the code into the
<head>section. -
If your theme supports it, go to Appearance > Customize > Additional Settings to add the code.
Once done, save the changes and return to Pinterest to click “Submit” to send the verification request.
Method 2: Download the HTML File and Upload It to Your Website Server
If you have access to your website’s server, you can choose this method. Pinterest will provide an HTML file, which you need to download to your computer and then upload to the root directory of your website using a file manager or FTP.
For example, if your website is www.example.com, you need to upload the HTML file to:
www.example.com/pinterest.html
Once done, return to Pinterest and click “Submit” so the system can check and verify your website.
Method 3: Verify Using a DNS (Domain Name System) Record
If you don’t want to edit your website’s source code or upload a file to the server, you can use the DNS verification method.
Pinterest will provide a TXT record, which you need to copy and then access your website’s domain management panel (usually where you purchased your domain, such as GoDaddy, Namecheap, Cloudflare, or Google Domains).
-
In the DNS management section, select Add New Record.
-
Choose TXT as the record type, paste the Pinterest-provided content into the Value field, and save the changes.
After adding the record, return to Pinterest and click “Submit” to start the verification process. This may take anywhere from a few minutes to several hours, depending on your domain provider.
Step 4: Check Verification Status and Complete the Process
After submitting the verification request, you will need to wait for Pinterest to review it. Typically, if everything is set up correctly, verification takes only a few minutes. However, in some cases, it may take 24-48 hours.
You can check the verification status by going back to the “Claim Website” section in the settings. If the process is successful, you will see your website displayed with a ✔ verification checkmark next to it.
Once your website is verified, you will gain access to advanced Pinterest features, such as Pinterest Analytics, allowing you to track performance and promote your content more effectively.
Step 5: Share Content from Your Website to Pinterest to Increase Views
Once your website is successfully verified, you can start pinning content from your site to Pinterest. This is a crucial step to drive traffic and maximize the platform’s potential.
Make sure to:
-
Use eye-catching images: Pinterest is a visual platform, so high-quality, engaging images will help your content stand out.
-
Add detailed descriptions for each pin: Write descriptions with relevant keywords to improve visibility in search results.
-
Share content consistently: Don’t just pin once and forget about it. Develop a regular pinning strategy to keep your audience engaged.
-
Install the “Save to Pinterest” button on your website: This makes it easier for visitors to save your content to their boards, helping to expand your organic reach.
Read more: What is a Pinterest Board? How to Create a Pinterest Board Easily
III. I Can’t Save My Website Address with HTTPS on Pinterest – How to Fix It
"I can’t save my website address with HTTPS on Pinterest." The cause of this issue may stem from various factors, including SSL certificate problems, URL formatting errors, or issues on Pinterest’s end. Below are detailed solutions to help you thoroughly resolve this problem.
1. Check Your Website’s SSL Certificate
One of the most common reasons you cannot save a web address on Pinterest is that the website’s SSL certificate is not properly configured. Pinterest requires websites using HTTPS to have a valid SSL certificate. If your certificate has expired or is incorrectly installed, Pinterest may not recognize your website.
You can check the status of your SSL certificate by accessing your website in the Chrome browser. If you see a green padlock icon next to the address bar, it means your SSL certificate is valid. On the other hand, if you receive a "Not Secure" warning, you need to check your SSL certificate.
If your website does not have an SSL certificate or if the certificate has expired, you can contact your hosting provider to reinstall it. Nowadays, many hosting providers, such as Namecheap, Bluehost, and SiteGround, offer free SSL certificates through Let's Encrypt, allowing you to enable HTTPS easily without any cost.
2. Ensure Your Website Runs Completely on HTTPS
Even if you have an SSL certificate, your website may still encounter issues if it has not been fully migrated to HTTPS. Some websites retain certain content or images loaded via the old HTTP protocol, causing a mixed content error. When this happens, Pinterest may refuse to verify your website because it does not provide absolute security.
To check and fix this issue, you can use tools like Why No Padlock or Chrome DevTools to scan your website and identify any content that has not been converted to HTTPS. If you find HTTP content on your site, you need to update the links manually or use a plugin like Really Simple SSL (if you are using WordPress) to automatically convert all content to HTTPS.
3. Check the URL Format When Entering It on Pinterest
Another reason you may not be able to save your website on Pinterest is entering the URL in the wrong format. When adding your website to your profile, you must enter the exact address, including the "https://" prefix. If you only enter "www.yourwebsite.com" or "yourwebsite.com", Pinterest may not recognize your website.
To avoid this issue, copy the exact URL from your browser’s address bar and paste it into the verification field on Pinterest. If your website has multiple versions (HTTP and HTTPS, with or without "www"), make sure you are using the standardized version with HTTPS as the default.
4. Try Verifying Your Website Using a Different Method
Pinterest offers multiple ways to verify website ownership, not just through the HTTPS URL. If you are unable to verify your website by entering the web address, try one of the following methods:
-
Upload an HTML file to your server: Pinterest provides an HTML file that you can download and place in your website’s root directory. Once done, go back to Pinterest and click "Complete" to confirm.
-
Insert a meta tag into the homepage: If you have access to your website’s source code, try this method by copying the meta tag provided by Pinterest and pasting it into the
<head>section of your homepage. -
Use DNS verification: If you have technical knowledge, you can add a TXT record to your domain’s DNS settings. This method usually takes some time for the system to update but is the most effective if you encounter HTTPS-related errors while verifying your website on Pinterest.
Read more: [Answer] How to Follow People on Pinterest?
5. Clear Browser Cache and Try Again
If you have checked all the steps above but still cannot save your website address on Pinterest, try clearing your browser cache. Sometimes, the browser may store an outdated version of the website, causing unexpected errors. You can go to Browser Settings > Clear Browsing Data > Clear Cache to ensure the latest version of your website is loaded.
Additionally, you can try opening the website in incognito mode or using a different browser to check if the issue persists. If the error only occurs on a specific browser, the problem may not be with the website itself but with your browser settings.
6. Contact Pinterest Support
If you have tried all the above methods but still encounter issues, the final step is to contact Pinterest Support. You can submit a support request through the Pinterest Help Center, providing details about the error you are experiencing, including screenshots and a description of the issue.
Pinterest may take a few days to respond, but if the issue is on their end, their technical team will work on a solution. In the meantime, you can try repeating the previous steps to ensure all your settings are correct.
Don’t let minor errors stop you from leveraging Pinterest to attract customers! If you now know how to pin your website on Pinterest, give it a try today and see the results. If you're facing HTTPS-related issues, double-check your SSL certificate and try again. Snappin believes that by following the right steps, you will see a noticeable improvement in your traffic. Good luck!
